

In today’s market there is such a wide selection of dropside styles available for your stretchers, so which one is best?
Firstly, to choose the most suitable dropside for your stretcher there are a range of points to consider;
- Will the stretcher be moved over long distances regularly or never moved?
- Will the patient require side rail support often, or rarely?
- What is your main type of patient, young, insecure, aged, bariatric or general?
- Does the function need to be quick and easy for emergency access?
- Are there regular bed to bed transfers involved?
- Is lateral x-ray performed sometimes?
- What level of access to the patient do the carers or surgical staff need?
- How much support can be retained during procedures?
- Will there be higher levels of support required during patient recovery?
Once these points have been taken into consideration and potentially helped to scope out which one would be best suited to your needs, the following options can then be chosen from;
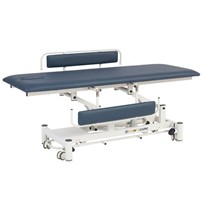
Why choose patient support bars?
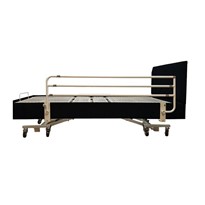
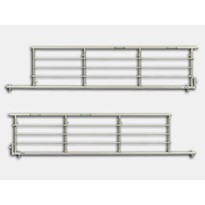
The cross bars within a dropside are usually either positioned in a vertical or horizontal fashion. The importance of this is subject to opinion and your own independent facility studies. Globally the most common design is using vertical bars, which may be spaced at varying distances based on the brand of stretcher or options for the type of patient support required. This may help with the prevention of limbs from swinging out sideways from the stretcher during transport.
There are, however, a number of pivot points where the dropside folds down to and rests. This means the top handhold positions are usually operated in sections. Horizontal bars can offer full, uninterrupted support along the length of the patient’s body. The stop or rest points are generally lower down at each end which helps to provide a clear top handrail for the patient or carer, however if not positioned or spaced well, could promote side limb projection or entrapment.
Why choose sideways folding dropsides?
These fold down towards your left or right and require a gap at the end of the stretcher top (that it folds to), which is equal or greater than the height of the side rail. This is a necessity in both vertical and horizontal support bar dropside styles. Traditionally this gap is always found at the foot end of the stretcher, however there is sometimes the option to reverse fold and reposition to shift the gap to the head end – this can be particularly helpful where frequent access to the patient’s head is required or when children need to be properly contained. Depending on the stretcher brand or options, the handrail can fold down to various positions, either above or below the mattress platform surface.
Above the surface designs can assist with positive mattress retention and larger handrail sizes with clear finger gaps for easier and safer operation. Below surface designs can facilitate bed to bed mattress transfers and lateral x-ray requirements, however the handrail sizes are smaller and more slimline to allow critical finger clearances when passing down the outside of the top frame. Depending on the dropside design, below surface folding may obstruct clear access to base storage and brakes, or alternatively a compact outcome can allow more flexibility in the construction of a stretcher, with less restrictions on both the width and low height of the top surface.
Why choose drop-away side rails?
These fall vertically down and back under the stretcher top. These are traditionally longer in overall length then the sideways folding designs, as they don’t require a gap at either end of the stretcher top for folding. The drop away style can provide a completely free top surface with no side rail components or handrail to obstruct the patient or carers and allows for a zero-transfer gap during bed-to-bed transfers. As the raised height still has minimum requirements for best patient support, dropping the full side rail height down under the stretcher top can restrict both the low height and width of the stretcher top.
The side rail when lowered in some designs could require the operator to step back from the stretcher or obstruct both feet clearance and brake operation. The construction of this style of side rail is usually heavier and may fall quickly or be harder to lift. Some side rails require spring or gas dampening and weight assistance, potentially causing additional maintenance requirements.
Why choose split fold side rails?
Working similar to the sideways folding dropsides, split fold divides the main side rail in half, allowing both halves to be independently folded down towards either the head or foot end of the stretcher top. This can be particularly useful where maximum support is required, allowing a doctor or carer to access just one part of the patient without compromising on safety. On standard stretcher side rail designs, the entire dropside must be lowered to access the patient, leaving the patient totally unrestrained.
Why choose push handle side rails?
Sometimes the positioning of side rails is to intentionally facilitate the pushing and maneuvering of the stretcher for transport. While convenient, this should always be considered, as it will apply higher loads and forces to the dropside supports and locking mechanisms than in the normal intended patient support role that a dropside is provided for, potentially increasing premature wear and tear of the unit. As dropsides are normally positioned on the furthest outsides of the stretcher top, the pushing positions could be too far apart and not ergonomically sound for the operator increasing the risk of strain injuries.
As you can see there are alot of options to choose from when it comes to dropsides/ side rails. It’s important to remember that whichever manufacturer you decide to purchase through, they should be able to provide you with localised support, regular maintenance and servicing, spare parts and user guides on all stretchers and accessories.


-160x160-state_article-rel-cat.png)