


Setting New Standards of Care The introduction of digital technologies in the dental field, such as 3D printing, are setting new standards of care. Clinicians have more autonomy on the processes and instruments they use and the communication with dental laboratories becomes faster and more efficient. Digital independence is supported by truly open standardized user interfaces.
Accurate surgical planning and simulation are complemented by in-house 3D printing, which enables a predictable and exact end result. Moreover, 3D printing technology and materials provide highly customizable treatment options for complex cases. Surgical drill guides can be effectively fabricated via 3D printing for guided implantology. Surgical Guide Resin is an autoclavable, biocompatible material (Class I) that exceeds dental demands in accuracy, part quality, and performance for applications including 3D printing dental surgical guides for implant placement. This clinical case shows the restoration process of a patient with partial edentulism using CAD/ CAM workflows.
The plaster models were digitized and integrated directly into an open-source CAD software where it was superimposed on the radiographic images. The surgical drill guide was planned and designed at the laboratory by close collaboration with the clinician and manufactured at the dental practice on a Form 3B with Surgical Guide Resin. Lateral view of initial clinical situation. Occlusal view of initial clinical situation FORMLABS:
Using Surgical Guide Resin for Implant Placement In a Partial Edentulism Case 4 Treatment & Surgical Procedure Treatment Plan The rehabilitation process consisted of two main phases, shown below.
Phase One: Surgical Phase
- Impressions
- Teeth cleaning
- Digital planning of the implant placement and fabrication of the surgical guide
- Placement of the implants (24, 27) using a drilling template/surgical guide
Phase Two: Prosthetic Phase
- Impressions (of the implants)
- Fabrication of the full-ceramic bridge
- Fixing the bridge on the implants
Planning of implant placement based on the CBCT Planning of implant placement based on the CBCT Execution of Treatment Plan After the healing phase, a CBCT was taken to plan the implant placement and surgical technique.
Due to the poor remaining bone volume and quality, it was decided to place the implants using a surgical guide to guarantee their accurate position in the areas where the bone quality was sufficient. Bone augmentation was discarded as a solution due to the complexity of this procedure for this specific clinical case. Alginate impressions were taken of both arches and sent to the dental laboratory, alongside the instructions for the implant positions, for design and fabrication of the surgical guide . A professional tooth cleaning was performed to prepare the oral cavity in a good hygienic condition for the operation.
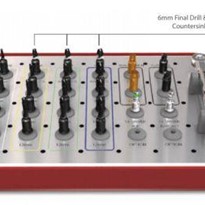
FORMLABS: Using Surgical Guide Resin for Implant Placement In a Partial Edentulism Case 5 Design Stage The plaster models were made from the impressions and digitized in Mr. Neubarth´s laboratory using a desktop scanner (Sirona InEos X5). The digital models could be superimposed with the CBCT (3D Accuitomo 170) in the software (Blender for dental). Artificial teeth were set up in the software and two implants of the appropriate length and diameter (Twinfit from Dentaurum) were imported. Printed model in Model V2 Resin (left). Surgical guide with metal sleeves inserted (right). The tooth supported guide was fitted to the printed model prior to sterilization After the final position of the implants was achieved and confirmed, the full arch surgical guide was designed considering the compatible guide sleeves. Manufacturing Stage The surgical guide file was exported as an STL and imported in PreForm.
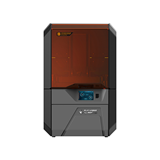
The surgical guide was oriented following the manufacturer’s instructions with the intaglio surface facing away from the build platform. Support structures were automatically generated and controlled so that no supports were added in undesired areas (intaglio surface of the guide and around the drill sleeve slot). The file is sent to print to the SLA Form 3B using Surgical Guide Resin and a 50 microns layer height setting. After printing is completed, the part is post-processed via washing, dry, and curing following manufacturer’s (in this case, Formlabs) instructions. The support structures were removed and the surgical guide was fitted to the printed model, ground, smoothed, polished, and then delivered to the office where it was sterilized.
The surgical guide was tested intraorally in the patient’s mouth prior to surgery to ensure proper fit and adaptation. Positioning the implants with the bridge FORMLABS: Using Surgical Guide Resin for Implant Placement In a Partial Edentulism Case 6 Surgical Procedure A flapless surgical technique was chosen due to the fact that it is a minimal invasive procedure and there were appropriate clinical conditions to carry it out. After anesthesia was given, the surgical guide was positioned upon the supporting teeth and used to do the punch to remove the mucosa. A sequence of burs and their respective additional sleeves are used to gradually widen the bone (with a total of three drills, starting with the thinnest diameter). The implants were placed through the surgical guide and screwed into the bone holes up to the definitive bone height (this is a marking on the screw-in aid). The implants are fitted with a healing cap. Finally, a radiographic panoramic view control is done. Postoperative OPG control Final photo documentation postcementation The implants were left to heal for three months.
No control was necessary during this healing period. Follow Up & Conclusion Follow-Ups After three months, the implants were exposed. One week after uncovering, an impression of the implants was taken using a closed tray (double mix: Detaseal hydroflow putty + lite) and was sent to the laboratory to digitize the case and fabricate the final zirconia bridge. The bridge was delivered to the practice and cemented to the implants with Fuji PLUS PowderLiquid (GC). The patient had follow ups for 12 months after the cementation, she was free of pain and very satisfied with the bridge.
Conclusion The production of surgical guides for implantology via 3D printing with the Form 3B+ and Surgical Guide Resin is an advantageous alternative to traditional (non-guided) surgical techniques. The digital workflow allows for improved communication with the dental laboratory and better control with higher accuracy during the procedure.


-205x205.jpg)